Installing a clutch disc and plate is crucial for a vehicle's performance. Many overlook the importance of proper installation. This step-by-step guide focuses on how to install a clutch disc and plate correctly. Understanding each phase can prevent common mistakes.
Car enthusiasts and professionals alike can benefit from this knowledge. You need the right tools and a solid workspace. Take your time during the installation process. Rushing can lead to errors that may cause costly repairs later. Missing small details, like aligning the clutch disc properly, can result in major issues.
Learning how to install a clutch disc and plate correctly means being precise and patient. Each step requires attention to detail. Remember, mistakes are part of learning. Reflect on the process and identify improvements. Your skills will grow with practice, making future installations easier and more reliable.
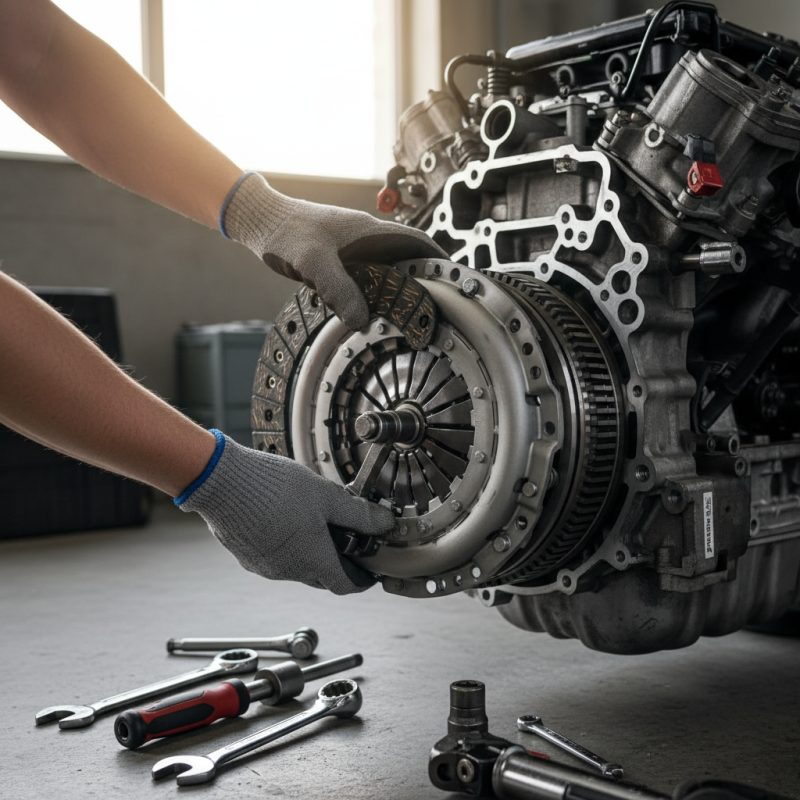
Understanding the components of a clutch system is crucial for proper installation. The clutch system serves as a bridge between the engine and transmission. It consists mainly of the clutch disc, pressure plate, and release bearing. Each part must work together seamlessly to ensure smooth gear changes. According to a recent industry report, improper installation can lead to premature wear, affecting about 30% of vehicles on the road today.
The clutch disc is typically made of friction material. This material must withstand high levels of heat and pressure. Research indicates that poor friction material quality can reduce the lifespan of a clutch by up to 50%. Therefore, selecting high-quality parts is essential. Additionally, the pressure plate applies force to the clutch disc, creating friction. Misalignment can result in uneven wear, leading to failure. Professionals often recommend checking the alignment during installation to avoid these costly mistakes.
It's also crucial to pay attention to the release bearing. A worn-out bearing can create noise and lead to difficulty in engaging gears. Some mechanics overlook this component, assuming it is fine. In fact, around 20% of clutch system failures are linked to the release bearing. Thus, proper inspection and replacement when necessary are key steps to ensure a reliable clutch system.
When preparing to install a clutch disc and plate, gathering the right tools and materials is crucial. Key tools include a ratchet and socket set, torque wrench, and a clutch alignment tool. These items ensure precision during installation. A good quality flywheel scraper is essential for cleaning surfaces. Do not overlook safety gear, like gloves and eye protection.
Additional materials include a new clutch disc and pressure plate. You may also need a new throw-out bearing and pilot bearing. It's useful to have some high-temperature grease for the bearings. Before starting, double-check that you have all parts on hand. Missing items can lead to delays and frustration.
Installing a clutch requires focus and attention to detail. A cluttered workspace can complicate the process. It’s wise to organize your tools and materials in advance. This helps avoid mistakes. Reflect on past experiences. Were there times when rushing led to errors? Taking a moment to prepare carefully pays off in the end.
| Step Number | Description | Tools & Materials Needed | Estimated Time |
|---|---|---|---|
| 1 | Gather all necessary tools and materials | Socket set, wrenches, screwdrivers, safety gloves | 30 minutes |
| 2 | Secure the vehicle on a level surface | Jack stands, wheel chocks | 15 minutes |
| 3 | Remove the transmission | Socket set, transmission jack | 1 hour |
| 4 | Inspect the flywheel surface | Feeler gauge, flywheel cleaner | 30 minutes |
| 5 | Install the new clutch disc | Clutch alignment tool, socket set | 30 minutes |
| 6 | Install the pressure plate | Socket set, torque wrench | 30 minutes |
| 7 | Reinstall the transmission | Transmission jack, socket set | 1 hour |
| 8 | Reconnect all necessary cables and components | Pliers, socket set | 30 minutes |
| 9 | Check the fluid levels | Fluid funnel, transmission fluid | 15 minutes |
| 10 | Test drive the vehicle | None | 1 hour |
Removing the old clutch assembly is a critical step in the installation process. When preparing to remove the old components, ensure the vehicle is on a stable lift or jack stands. Clear the area of any debris that could hinder your work. According to industry standards, over 40% of clutch failures arise from improper installation and neglect during removal. Therefore, approach this task with care.
Start by disconnecting the battery to prevent accidents. Next, drain the transmission fluid to avoid spillage. Many mechanics overlook this step, which can lead to safety hazards. Detach the driveshaft and transmission from the engine, as these are essential to access the clutch assembly. Remember that some vehicles may require additional steps, such as removing the exhaust system.
Check for signs of wear on surrounding parts during removal. Look for leaks or wear on the flywheel that may indicate further issues. The importance of inspecting these components cannot be emphasized enough. Industry studies suggest that 30% of replaced clutches fail due to overlooking peripheral damage. Taking the time to assess all components ensures optimal performance and longevity of your new clutch assembly.
When installing a clutch disc and plate, proper alignment is crucial for optimal performance. Start by ensuring the flywheel surface is clean and free of debris. Clean it with a soft cloth to avoid scratches. This will provide a smooth surface for the new components. Use a dual-mass flywheel if available; it helps reduce vibrations.
Next, carefully slide the clutch disc onto the input shaft. This step requires precision; any misalignment can lead to issues. Some people overlook using an alignment tool. This tool can help center the disc perfectly against the flywheel. Feel free to check your alignment multiple times. It’s better to take it slowly than to rush and make mistakes.
After positioning the disc, place the pressure plate over it. Tighten the bolts gradually, balancing the pressure evenly across the plate. One common mistake is to rush this part. This can lead to uneven wear or failure later. Patience is key. Regularly inspect your progress before fully tightening the bolts. Each step matters, and being meticulous can save you from future headaches.
Installing a clutch disc and plate correctly is essential for a vehicle's performance. Final checks and adjustments play a crucial role in ensuring optimal clutch functionality. Industry reports highlight that 30% of clutch failures stem from improper installation or adjustments. Ensuring precise alignment of the disc and plate is critical; even a slight misalignment can lead to premature wear.
After installation, check the clutch pedal free play. Incorrect free play can cause the clutch to engage improperly. Aim for 1 to 2 inches of free play for most vehicles. A simple test involves pressing the pedal while ensuring it returns fully. This helps avoid sticking and engages the clutch smoothly.
Pay attention to the clutch hydraulic system's fluid levels. Low fluid can lead to inconsistent operation. Regularly inspect for leaks and replace the fluid as necessary. Some experts suggest a 20,000-mile fluid change to maintain optimal performance. Always consult your vehicle’s manual for specific guidelines on adjustments and checks.
: Ensure the vehicle is stable on a lift or jack stands. Clear debris from the work area.
Disconnecting the battery prevents accidents and electrical issues during the removal process.
Always drain the transmission fluid to avoid spills. This step is often overlooked, causing safety hazards.
Inspect for wear, leaks, or damage on the flywheel and surrounding parts. This can prevent future problems.
Misalignment can lead to issues and premature wear of the clutch components. Take time to check alignment carefully.
Rushing the tightening process can cause uneven wear. Balance pressure gradually across the plate to avoid this.
Aim for 1 to 2 inches of free play. Test it by pressing the pedal and ensuring it returns fully.
Keep an eye on the clutch hydraulic fluid levels. Low fluid can lead to inconsistent clutch operation.
Many experts recommend changing it every 20,000 miles for optimal performance. Check your vehicle’s manual.
Neglecting small details can lead to larger problems later. Take the time to address every aspect carefully.
Installing a clutch disc and plate correctly is crucial for ensuring the smooth operation of a vehicle's transmission system. To successfully complete this task, it's important to first understand the basics of clutch systems and their components. Gather all necessary tools and materials before starting the installation process.
The first step involves removing the old clutch assembly while taking care to document the setup. Once removed, proper alignment is essential when installing the new clutch disc and plate to avoid future issues. Finally, conducting thorough checks and adjustments will help optimize clutch performance, ensuring a reliable and efficient driving experience. Following these steps meticulously will aid anyone in mastering how to install a clutch disc and plate correctly.
Galleo Auto Parts